SpringMVC学习笔记
Spring优缺点 优点: Spring是java企业级的轻量代替品,Spring为企业级java开发提供了一种相对简单的方法,通过依赖注入 和面向切面编程 ,用简单的java对象实现了EJB的功能。
缺点: 虽然Spring的组件是轻量级的,但是Spring的配置文件确实重量级的,此外项目的依赖管理也是一件耗时耗力的事。
Spring的概述 SpringBoot对上述Spring的缺点进行了改善了优化,基于约定由于配置 的思想,可以让开发人员不必在配置与逻辑业务之间进行思维的切换,全身心的投入到逻辑业务的代码编写中。
SpringBoot的优点
为基于Spring的代码开发提供了更快的入门体验
开箱即用,没有代码生成,也无需xml配置,同时可以修改默认值来满足特定的需求
提供了一些大型项目中常见的非功能性特性,如嵌入式服务器,安全,指标,健康检测,外部配置等。
SpringBoot不是对Spring功能上的增强,而是提供了一种快速使用Spring的方式
SpringBoot的核心功能
起步依赖本质上是一个Maven项目对象模型,定义了对其他库的传递依赖,这些东西加载一起即支持某项功能。
简单的说,起步依赖就是将具备某种功能的坐标打包到一起,并提供一些默认的功能。
SpringBoot的自定配置是一个运行的过程,考虑了众多元素,才决定Spring配置中应该用哪个,不该用哪个,该过程是SpringBoot自动完成的。
SpringBoot原理分析 起步依赖 按住Ctrl点击pom.xml中的spring-boot-starter-parent,跳转到了spring-boot-starter-parent的pom.xml,xml配置
1 2 3 4 5 <parent > <groupId > org.springframework.boot</groupId > <artifactId > spring-boot-dependencies</artifactId > <version > 2.3.4.RELEASE</version > </parent >
按住Ctrl点击pom.xml中的spring-boot-starter-dependencies,跳转到了spring-boot-starter-dependencies的
1 2 3 4 5 6 7 8 9 10 11 12 13 14 15 16 17 18 19 20 21 22 <properties > <activemq.version > 5.15.13</activemq.version > <antlr2.version > 2.7.7</antlr2.version > <appengine-sdk.version > 1.9.82</appengine-sdk.version > <artemis.version > 2.12.0</artemis.version > <aspectj.version > 1.9.6</aspectj.version > <assertj.version > 3.16.1</assertj.version > <atomikos.version > 4.0.6</atomikos.version > <awaitility.version > 4.0.3</awaitility.version > <bitronix.version > 2.1.4</bitronix.version > <build-helper-maven-plugin.version > 3.1.0</build-helper-maven-plugin.version > <byte-buddy.version > 1.10.14</byte-buddy.version > <caffeine.version > 2.8.5</caffeine.version > <cassandra-driver.version > 4.6.1</cassandra-driver.version > <classmate.version > 1.5.1</classmate.version > <commons-codec.version > 1.14</commons-codec.version > <commons-dbcp2.version > 2.7.0</commons-dbcp2.version > <commons-lang3.version > 3.10</commons-lang3.version > <commons-pool.version > 1.6</commons-pool.version > <commons-pool2.version > 2.8.1</commons-pool2.version > <couchbase-client.version > 3.0.8</couchbase-client.version > <db2-jdbc.version > 11.5.4.0</db2-jdbc.version >
从上面的spring-boot-starter-dependencies的pom.xml中我们可以发现,一部分的坐标版本、管理依赖、插件管理已经定义好了,所有我们的SpringBoot工程继承spring-boot-stater-parent后已经具备版本锁定等配置了。所有起步依赖的作用就是进行依赖的传递。
自动配置 按住Ctrl点击查看启动类MySpringBootApplication上的注解@SpringBootApplication
1
2
3
4
5
6
7
@SpringBootApplication public class Springdemo02Application public static void main (String[] args) SpringApplication.run(Springdemo02Application.class , args ) ; } }
注解@SpringBootApplication的源码
1
2
3
4
5
6
7
8
9
10
11
12
13
14
15
16
17
18
19
20
21
22
23
24
25
26
27
28
29
30
31
32
33
34
35
36
37
38
39
40
41
42
43
44
45
46
47
48
49
@Target ({ElementType.TYPE})@Retention (RetentionPolicy.RUNTIME)@Documented @Inherited @SpringBootConfiguration @EnableAutoConfiguration @ComponentScan ( excludeFilters = {@Filter ( type = FilterType.CUSTOM, classes = {TypeExcludeFilter.class } ), @Filter ( type = FilterType.CUSTOM, classes = {AutoConfigurationExcludeFilter.class } )} ) public @interface SpringBootApplication @AliasFor ( annotation = EnableAutoConfiguration.class ) Class<?>[] exclude() default {}; @AliasFor ( annotation = EnableAutoConfiguration.class ) String[] excludeName() default {}; @AliasFor ( annotation = ComponentScan.class , attribute = "basePackages" ) String[] scanBasePackages() default {}; @AliasFor ( annotation = ComponentScan.class , attribute = "basePackageClasses" ) Class<?>[] scanBasePackageClasses() default {}; @AliasFor ( annotation = ComponentScan.class , attribute = "nameGenerator" ) Class<? extends BeanNameGenerator> nameGenerator() default BeanNameGenerator.class ; @AliasFor ( annotation = Configuration.class ) boolean proxyBeanMethods () default true ;}
其中,
1
2
3
4
5
6
7
8
9
10
11
12
13
@Target ({ElementType.TYPE})@Retention (RetentionPolicy.RUNTIME)@Documented @Inherited @AutoConfigurationPackage @Import ({AutoConfigurationImportSelector.class }) public @interface EnableAutoConfiguration String ENABLED_OVERRIDE_PROPERTY = "spring.boot.enableautoconfiguration" ; Class<?>[] exclude() default {}; String[] excludeName() default {}; }
SpringBoot工程热部署 在pom.xml中添加(也可在创建SpringBoot项目的时候勾选)
1 2 3 4 5 6 7 <dependency > <groupId > org.springframework.boot</groupId > <artifactId > spring-boot-devtools</artifactId > <scope > runtime</scope > <optional > true</optional > </dependency >
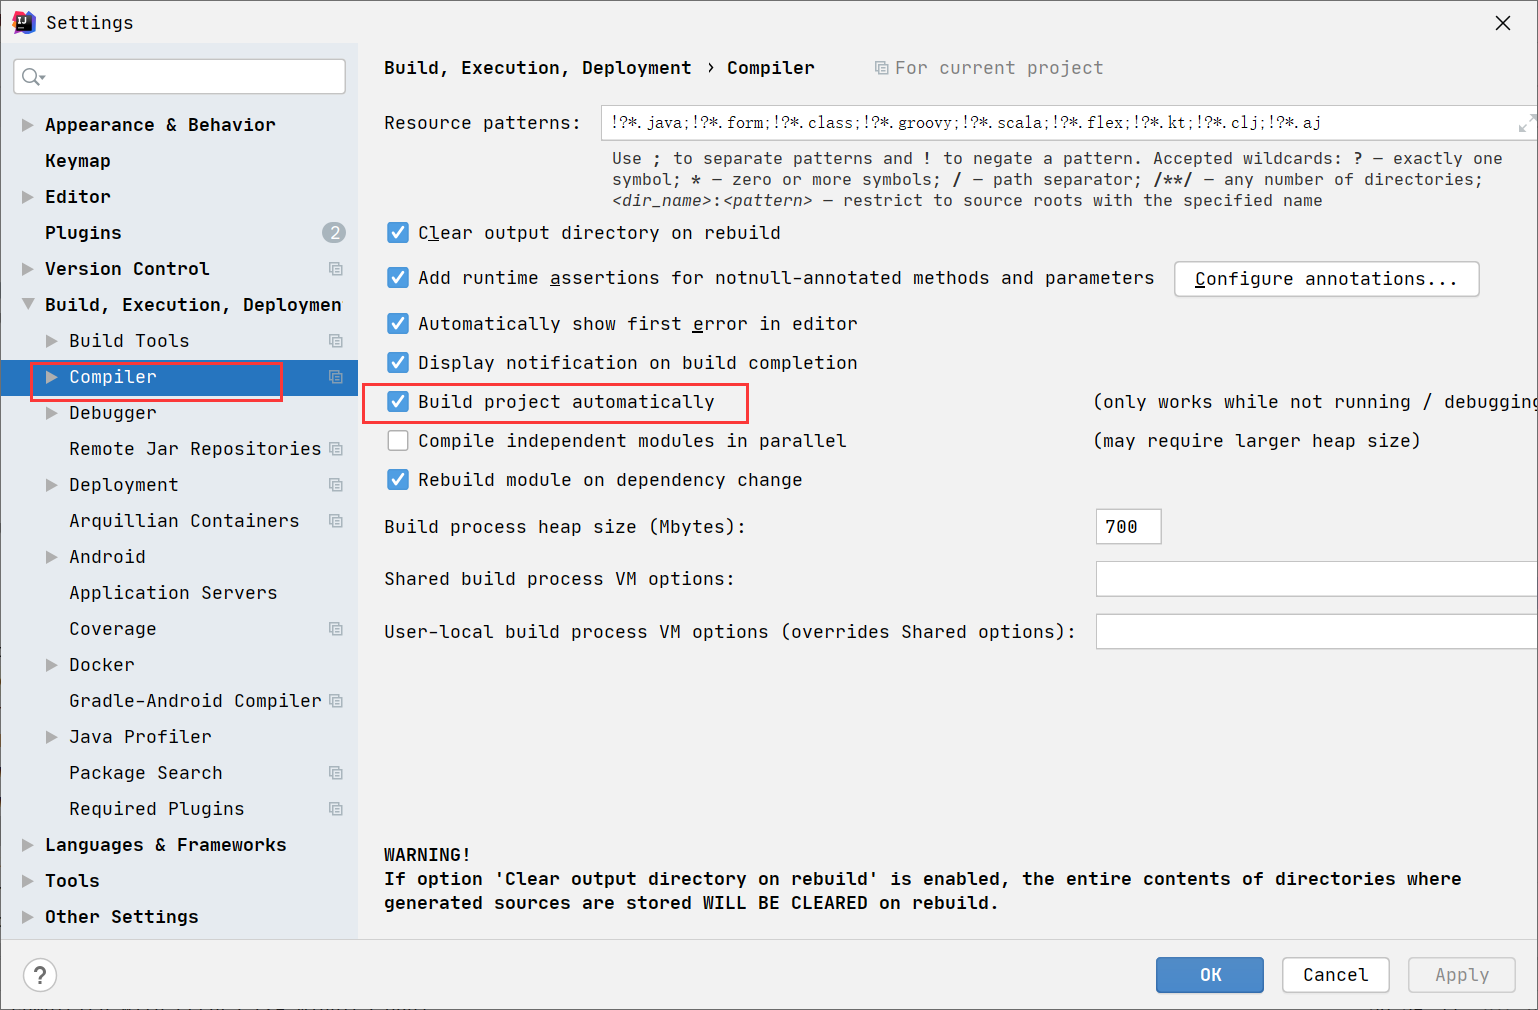
对idea进行配置
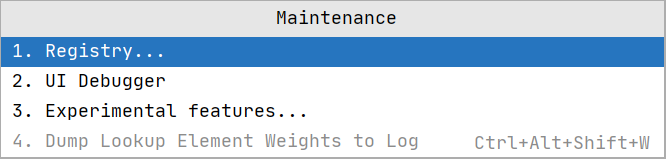
然后 Shift+Ctrl+Alt+/,选择Registry
勾选
SpringBoot配置文件 SpringBoot是基于约定的,所有很多配置都有默认值,但如果相使用自己的配置替换默认配置的话,就可以使用application.properties或者application.yml进行配置。
自定义配置 配置文件与配置类的映射方式
1
2
3
person: name: zhangsan age: 20
使用@Value来映射 我们可以通过@Value注解将配置文件中的值映射到一个Spring管理的Bean的字段上
1 2 3 4 5 6 7 8 9 10 11 12 13 14 15 16 17 18 19 20 @Controller public class HelloController @Value ("${person.name}" ) private String name; @Value ("${person.age}" ) private int age; @ResponseBody @RequestMapping ("/index" ) public String index () System.out.println(name + "---------" + age); return "Hello Spring Boot" ; } }
使用@ConfigurationProperties 先导入依赖
1 2 3 4 5 <dependency > <groupId > org.springframework.boot </groupId > <artifactId > spring-boot-configuration-processor </artifactId > <optional > true </optional > </dependency >
测试类(提供set方法)
1 2 3 4 5 6 7 8 9 10 11 12 13 14 15 16 17 18 19 20 21 22 23 24 25 26 27 28 @Controller @ConfigurationProperties (prefix = "person" )public class HelloController private String name; private int age; @ResponseBody @RequestMapping ("/index" ) public String index () System.out.println(name + "---------" + age); return "Hello Spring Boot" ; } public void setName (String name) this .name = name; } public void setAge (int age) this .age = age; } }
整合Myabtis 添加Mybatis起步依赖和数据库驱动
1 2 3 4 5 6 7 8 9 10 11 12 <dependency > <groupId > org.mybatis.spring.boot</groupId > <artifactId > mybatis-spring-boot-starter</artifactId > <version > 2.1.0</version > </dependency > <dependency > <groupId > mysql</groupId > <artifactId > mysql-connector-java</artifactId > <version > 8.0.17</version > </dependency >
在application.yml中添加数据库配置信息
1 2 3 4 5 6 7 spring: datasource: driver-class-name: com.mysql.cj.jdbc.Driver url: jdbc:mysql://localhost:3306/study?serverTimezone=Asia/Shanghai&useUnicode=true&characterEncoding=utf8 username: root password: root
在application.yml中添加mybatis配置信息
1 2 3 4 5 6 7 8 mybatis: type-aliases-package: com.gem.springdemo1.entity mapper-locations: classpath:com/gem/springdemo1/mapper/*Mapper.xml configuration: log-impl: org.apache.ibatis.logging.log4j.Log4jImpl
SpringBoot默认使用logback作为日志打印工具,我们要想查看sql语句,需要使用log4j
导入log4j的起步依赖
1 2 3 4 5 6 7 8 9 10 11 12 13 <dependency > <groupId > org.springframework.boot</groupId > <artifactId > spring-boot-starter-log4j</artifactId > <version > 1.3.8.RELEASE</version > <exclusions > <exclusion > <groupId > org.slf4j</groupId > <artifactId > slf4j-log4j12</artifactId > </exclusion > </exclusions > </dependency >
在application.yml中配置
1
2
3
mybatis: configuration: log-impl: org.apache.ibatis.logging.log4j.Log4jImpl
整合Junit 添加依赖
1 2 3 4 5 6 <dependency > <groupId > org.springframework.boot</groupId > <artifactId > spring-boot-starter-test</artifactId > <scope > test</scope > </dependency >
在测试类上加上对应的注解
1
2
@SpringBootTest (classes = Springdemo1Application.class ) @RunWith (SpringRunner .class )
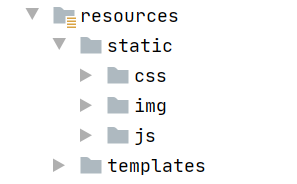
静态资源 在SpringBoot中有四个目录可以放我们的静态资源
- "classpath:/META-INF/resources/"
- "classpath:/resources/"
- "classpath:/static/"
- "classpath:/public/"
例如
网站图标的说明
与其他静态资源一样,Spring Boot在配置的静态内容位置中查找 favicon.ico。如果存在这样的文件,它将自动用作应用程序的favicon。
1、关闭SpringBoot默认图标
1 2 spring.mvc.favicon.enabled =false
2、自己放一个图标在静态资源目录下
Thymeleaf模板引擎 jsp支持非常强大的功能,包括能写Java代码,但是呢,我们现在的这种情况,SpringBoot这个项目首先是以jar的方式,不是war,像第二,我们用的还是嵌入式的Tomcat,所以呢,他现在默认是不支持jsp的 。SpringBoot推荐你可以来使用模板引擎
引入Thymeleaf
1 2 3 4 5 <dependency > <groupId > org.springframework.boot</groupId > <artifactId > spring-boot-starter-thymeleaf</artifactId > </dependency >
创建一个Controller,model添加一个User实体,返回hello.html
1 2 3 4 5 6 7 8 9 10 11 12 13 14 15 16 @Controller public class HelloController @RequestMapping ("/index" ) public String index (Model model) User user = new User(1L ,"张三" ,new Date()); model.addAttribute("user" ,user); model.addAttribute("num" ,10 ); model.addAttribute("gender" ,"w" ); return "hello" ; } }
在hello.html中获取数据
在html中引入Thymeleaf
1 <html lang ="en" xmlns:th ="http://www.thymeleaf.org" >
在标签中取值使用th:text(写在标签体中),使用#datas.format来格式化时间
处理字符串和数字类型同理
1 2 3 4 5 <div > <p th:text ="${user.id}" > </p > <p th:text ="${user.username}" > </p > <p th:text ="${#dates.format(user.createDate,'yyyy-MM-dd HH:mm:ss')}" > </p > </div >
如果是表单标签使用th:value设置值
1 <input type ="text" th:value ="${user.id}" >
单选框使用th:attr设置属性
1 2 <input name ="gender" type ="radio" th:attr ="checked=${gender eq 'm'?true:false}" > 男 <input name ="gender" type ="radio" th:attr ="checked=${gender eq 'w'?true:false}" > 女
if 1 2 3 4 5 6 <div > <p th:if ="${num == 10}" > num:10</p > <p th:if ="${num == 20}" > num:20</p > <p th:if ="${num == 30}" > num:30</p > </div >
switch case 1 2 3 4 5 <div th:switch ="${num}" > <p th:case ="10" > num为10</p > <p th:case ="20" > num为20</p > <p th:case ="30" > num为30</p > </div >
each 编写一个controller,模拟数据查询到的list
1 2 3 4 5 6 7 8 9 10 11 12 13 14 15 16 17 18 19 20 @Controller @RequestMapping ("/user" )public class UserController @RequestMapping ("/userList" ) public String userList (Model model) List<User> list = new ArrayList<>(); list.add(new User(1L ,"张三" ,new Date())); list.add(new User(2L ,"李四" ,new Date())); list.add(new User(3L ,"王五" ,new Date())); list.add(new User(4L ,"赵六" ,new Date())); list.add(new User(5L ,"田七" ,new Date())); model.addAttribute("userList" ,list); return "user" ; } }
html代码
1 2 3 4 5 6 7 8 9 10 11 12 13 14 15 16 17 <table > <tr > <th > 编号</th > <th > 姓名</th > <th > 创建时间</th > <th > 操作</th > </tr > <tr th:each ="u:${userList}" > <td th:text ="${u.id}" > </td > <td th:text ="${u.username}" > </td > <td th:text ="${#dates.format(u.createDate,'yyyy-MM-dd')}" > </td > <td > <a th:href ="@{/user/edit(id=${u.id})}" th:text ="编辑" > </a > <a th:href ="@{'/user/delete/' + ${u.id}}" th:text ="删除" > </a > </td > </tr > </table >
url、href、src问题, 原始?传参版本使用th:href动态的写,参数使用()传递
1 <a th:href ="@{/user/edit(id=${u.id})}" th:text ="编辑" > </a >
Controller
1 2 3 4 5 @RequestMapping ("/edit" )public String editUser (int id) System.out.println("要修改的id是" + id); return "user" ; }
Rest风格
1 <a th:href ="@{'/user/delete/' + ${u.id}}" th:text ="删除" > </a >
Controller
1 2 3 4 5 @RequestMapping ("/delete/{id}" )public String deleteUser (@PathVariable("id" ) int id) System.out.println("要删除的id是:" + id); return "user" ; }
使用{参数}表示展位符,使用@pathVaiable注解获取url中占位符,并且绑定到方法的参数上。
引入css
1 <link rel ="stylesheet" th:href ="@{/css/style.css}" >
全局异常处理 @ControllerAdvice搭配@ExceptionHandler注解
1 2 3 4 5 6 7 8 9 10 11 12 @ControllerAdvice public class WebException @ExceptionHandler (value = Exception.class ) public ModelAndView defaultException (Exception e , HttpServletRequest request ) { ModelAndView mv=new ModelAndView(); mv.setViewName("error" ); mv.addObject("exception" ,e); mv.addObject("url" ,request.getRequestURI()); return mv; }
拦截器 springboot拦截器和springmvc一样,自己定义一个类实现HandlerInterceptor接口,实现其中的preHandle方法就可以了。
1 2 3 4 5 6 7 8 9 10 11 12 13 14 15 16 17 18 19 20 21 22 23 24 25 26 27 28 29 30 31 32 33 34 public class WebInterceptor implements HandlerInterceptor @Override public boolean preHandle (HttpServletRequest request, HttpServletResponse response, Object handler) throws Exception String uri=request.getRequestURI(); System.out.println(uri); if (uri.endsWith("/login" )||uri.endsWith("/toLogin" )||uri.endsWith("/" )){ return true ; } HttpSession session=request.getSession(); Object user=session.getAttribute("currUser" ); if (user==null ){ response.sendRedirect(request.getContextPath()+"/toLogin" ); return false ; } return true ; } }
重要的是拦截器的配置。
自己定义一个配置类,打上@Configuration注解,实现WebMvcConfigurer接口,重写addInterceptors方法,注意静态资源要剔除掉。
1 2 3 4 5 6 7 8 9 10 11 @Configuration public class WebMvc implements WebMvcConfigurer @Override public void addInterceptors (InterceptorRegistry registry) registry.addInterceptor(new WebInterceptor()).addPathPatterns("/**" ) .excludePathPatterns("/css/**" ) .excludePathPatterns("/js/**" ) .excludePathPatterns("/images/**" ); } }
给指定视图添加控制层 同样写一个配置类,实现WebMvcConfigurer接口,实现addViewControllers方法
1 2 3 4 5 6 7 8 9 10 11 12 13 14 15 @Configuration public class WebMvc implements WebMvcConfigurer @Override public void addViewControllers (ViewControllerRegistry registry) registry.addViewController("/" ).setViewName("login" ); registry.addViewController("/toLogin" ).setViewName("login" ); } }
文件上传和配置本地静态资源路径 配置本地服务器路径为静态路径
注意原来的静态资源路径也要配置进去,自己本地的路径前要加file
1 2 3 4 5 6 7 spring: resources: static-locations: classptah:/static/,classpath:/public/,classpath:/resource/,file:${imgFile} imgFile: D:\a_demo\img
上传文件页面
修改表单的类型为multipart/form-data
1 2 3 4 5 6 7 8 9 10 11 12 13 <!DOCTYPE html > <html lang ="en" xmlns:th ="http://www.thymeleaf.org" > <head > <meta charset ="UTF-8" > <title > 文件上传</title > </head > <body > <form th:action ="@{/file/upload}" method ="post" enctype ="multipart/form-data" > <input type ="file" name ="imgFile" > <input type ="submit" value ="上传" > </form > </body > </html >
文件上传Controller,上传完毕进行展示
1 2 3 4 5 6 7 8 9 10 11 12 13 14 15 16 17 18 19 20 21 22 23 24 25 26 27 28 29 30 31 32 33 34 @Controller @RequestMapping ("/file" )public class FileUploadController @Value ("${imgFile}" ) private String targetPath; @RequestMapping ("/uploadPage" ) public String uploadPage () return "/upload/fileupload" ; } @RequestMapping ("/upload" ) public String upload (MultipartFile imgFile, Model model) throws IOException String fileName = imgFile.getOriginalFilename(); assert fileName != null ; String suffix = fileName.substring(fileName.lastIndexOf("." )); fileName = UUID.randomUUID().toString().replace("-" ,"" ).toLowerCase() + suffix; System.out.println("上传的文件名称:" +fileName); System.out.println("上传的路径" + targetPath); imgFile.transferTo(new File(targetPath,fileName)); model.addAttribute("path" ,fileName); return "upload/show" ; }
可以默认上传的文件大小
1 2 3 4 5 6 7 spring: servlet: multipart: max-file-size: 10MB max-request-size: 100MB
整合Mybatis分页插件 PageHelper 导入依赖
1 2 3 4 5 <dependency > <groupId > com.github.pagehelper</groupId > <artifactId > pagehelper-spring-boot-starter</artifactId > <version > 1.3.0</version > </dependency >
剩下的和Mybatis一样,设置分页参数,封装PageInfo对象即可。